Make a noise inventory
Sit where you edit with playback stopped. Listen for computer fans, storage drives, ventilation, traffic, voices and electrical hum. Write down when each appears and whether it changes with the equipment running. If you can safely switch a nonessential device off, compare the room with and without it. Do not disconnect protective earth connections or block cooling to chase a quieter room. A silent-looking computer enclosure can still need substantial airflow.
Repeat the check at the times you normally work. Morning traffic and evening household noise may call for scheduling changes rather than acoustic purchases. If dialogue recording shares the room, note which direction the microphone faces and what sits behind the speaker. A change in recording position can sometimes be more useful than adding material to the nearest empty wall.
Establish a balanced starting position
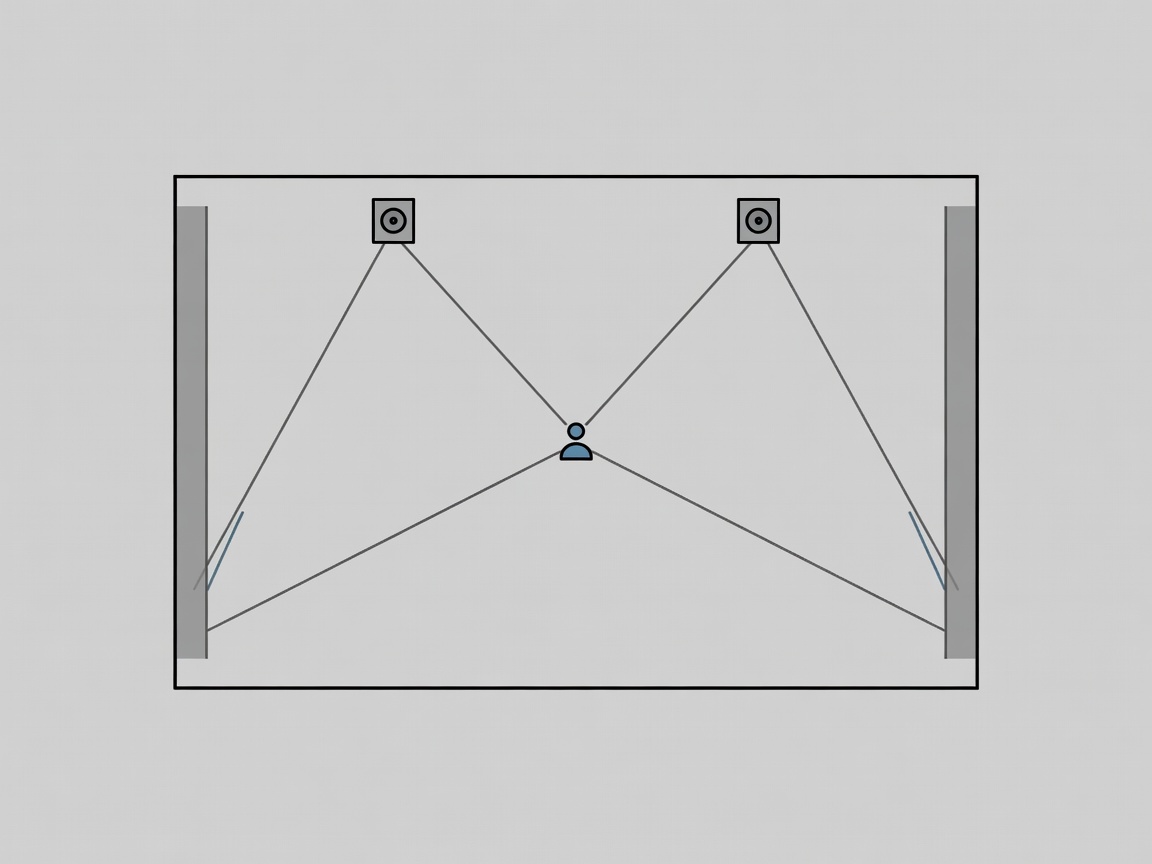
Where the room permits, place the listening position on the centerline between the side walls. Keep the left and right speakers at similar distances from you and start with a roughly equilateral triangle. Follow the speaker manufacturer’s guidance for orientation, listening axis and wall clearance. Avoid burying one speaker in a corner while leaving the other in open space. Large objects between a speaker and your ears can change what you hear.
Bring the speakers toward a suitable ear-level listening axis with stable stands or appropriate supports. Keep them from rocking or resting on loose stacks. Desk surfaces and nearby walls can introduce reflections and cancellations, so experiment with small position changes before purchasing treatment. There is no universal distance from a wall that solves every speaker and room combination. Mark the original position so you can compare and reverse a change.
Listen for reflections, not just echo
Play familiar, clean speech at a moderate level. Listen for a hollow quality, smeared consonants or a sharp flutter between parallel surfaces. A hand clap may reveal obvious flutter, but it does not measure the full acoustic behavior of the room. Rugs and curtains can affect some higher-frequency reflections; they should not be described as complete bass treatment. Softening every visible surface can leave a room unbalanced rather than accurate.
First-reflection areas on side walls are common places to investigate. A mirror method can help locate a geometric reflection path, but it is only a starting point. Thick broadband absorbers behave differently from thin decorative foam, and placement, construction and air gaps matter. Use properly manufactured, suitably fire-rated products and secure mounting methods. Do not install heavy overhead treatment without confirming the structure and fixings with a competent professional.
Name the problem before choosing the panel.
Keep treatment and isolation separate
Absorption changes how sound behaves within a room. Isolation reduces transmission between spaces. Thin foam on a wall will not reliably keep bass from reaching a neighbor or prevent road noise entering through a window. Isolation can involve mass, airtightness, decoupling and attention to flanking paths through floors, ceilings and services. These changes are building work, not a simple decorating exercise.
Discuss persistent transmission problems with a qualified acoustic consultant and, where needed, the building owner. Never seal required ventilation, fire doors or escape routes. Door and window improvements must remain compatible with the building’s safety needs. In a rented or shared home, reversible changes and agreed work hours may be the most practical starting point while you assess whether larger work is justified.
Measure when the question needs it
Room EQ Wizard, commonly called REW, can help investigate response and decay when used with a suitable measurement microphone and a controlled method. Keep speaker level, microphone position and test settings consistent when comparing changes. A phone recording is useful for keeping notes, but its automatic processing and microphone response limit what you can conclude. Avoid treating a single attractive graph as proof that the listening position is finished.
Speaker correction software can help within limits, but it cannot remove a long reverberation time or repair every deep cancellation. Position and treatment decisions come first. If the result remains confusing, an experienced acoustician can interpret measurements in context rather than recommending changes from a frequency-response screenshot alone.
Build a modest reference routine
Keep playback at a comfortable level and take listening breaks. Use familiar reference material, then check the project on suitable headphones as a second perspective. Headphones help expose small noises without the room’s reflections, but they do not reproduce speaker crossfeed or physical bass in the same way. Compare dialogue clarity and balance across your intended review devices, and record the limits of the room instead of pretending they have disappeared.
Before buying treatment
- Identify the source and timing of noise.
- Check speaker symmetry and clearance.
- Compare reversible position changes.
- Distinguish reflections from transmission.
- Use safe products, fixings and listening levels.